Manual Exposure and Focus: The Beginning of Your Masterpiece
Here's the ultimate guide on iPhone Camera Makes Masterpiece Series, you can keep pace with new articles coming up.
Before a photo comes into being, photographer knows what matter the most - focusing and exposure. When it nevertheless comes to iPhone photography, all steps are included to a click of the shutter. However, that doesn't mean that you don't need to focus on a point or area or adjust the exposure before you hit the shutter. iPhone merely determines the focusing and exposure for you by default.
The previous post: [Must-Read] Lucid Introduction to iPhone Camera Lenses
The upcoming post: Live Photos: An Image That Will Never Die
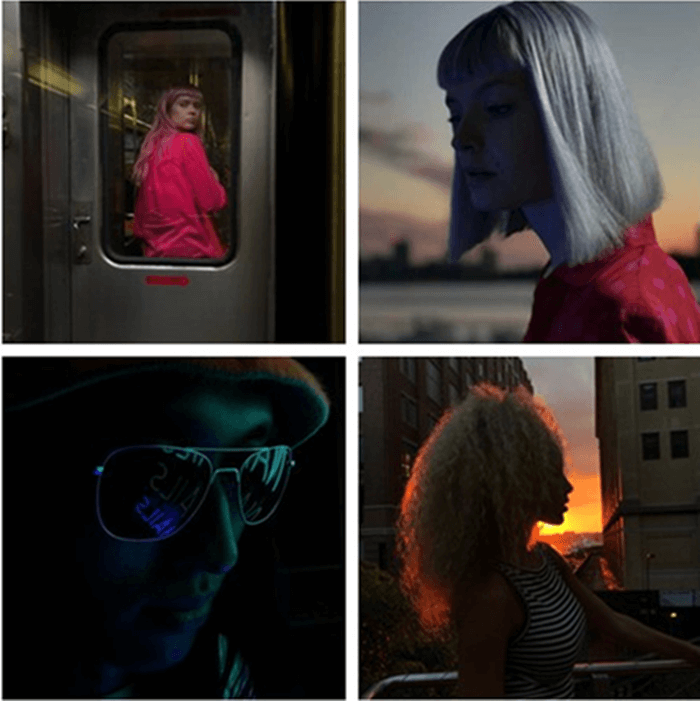
Despite the powerful algorithm in terms of photography, it's still far from able to 'calculate' and 'formulate' what a photo/video you truly want to capture. Instead, the algorithm is only able to produce a right picture, which is correct in the calculation but may not cater for the taste of people. Before we get down to a further introduction of focusing and exposure, let's check out a few pictures that come from Apple.com.
You must have noticed that all four editing-free photos are captured under bad lighting, however, they still seem awesome. These official images will not be out-fashioned even after years. These dark style pictures are sharp with a prominent outline and give a strong visual sensation with excellent coloring. Shadow and bright collides, evoking the story of days and nights.
You must be wondering now why we're unable to make such masterpieces even with the same iPhone model? Why are photos full of noises and get blurred when we take pictures at night or somewhere under bad lighting condition? The primary reason is that we ignore the importance of focusing and exposure by ourselves.
So, how to manually adjust the exposure on iPhone?
- Way 1: Tap on the screen. When you tap on a point or an area which is darker than other areas, it gets brighter.
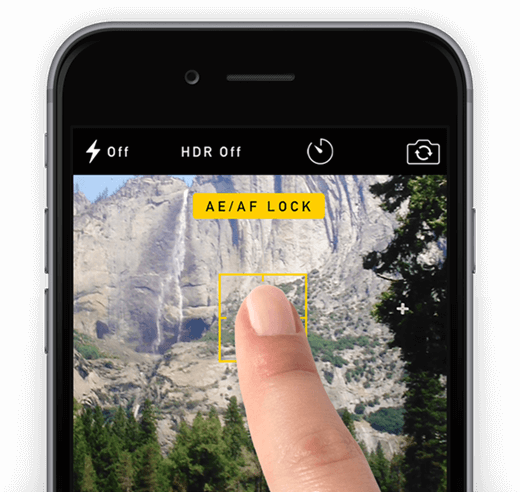
- Way 2: Long press on a point until you see "AE/AF Lock", and the area in the yellow square will be locked up. Now, you can swipe up or down to manually adjust the exposure.
The "AE/AF Lock" feature allows users to lock the focus and exposure values when taking a photo. Most people might not know this useful feature. When you're tapping on the screen, you're in fact looking for a proper focus as well. However, many people may have a misgiving that focusing is less perceivable than adjusting exposure. It seems no change. How come?
Then, you must understand why we should focus on a point when capturing a photo or a video.
When we're tapping on the screen and trying to focus on a point, we actually are adjusting the depth of field (DOF), which is the distance between the nearest and farthest objects in a scene that appears acceptably sharpness in an image. People usually take advantage of this feature to emphasize the subject while de-emphasizing the foreground and background.
The depth of field is an effective focus range that is perceivable and distinguishable through sharpness and unsharpness. There are a few factors that affect the depth of field. Let's check them out here.
- Aperture. Reducing the aperture diameter (increasing the f-number) increases the depth of field.
- Focal length. The longer the focal length is, the smaller DOF(shallow focus) is. That's also why 70-200mm lenses are better in portrait photographing.
- Focusing distance. The nearer, the smaller DOF is.
- The size of the scene. The bigger the scene, the smaller DOF is. That's also why phones are unable to have a good focus range.
Also, due to the wide-angle camera on iPhone, it brings about a less desirable depth of field, which is less noticeable compared to a digital camera. However, if you put an object near to the iPhone camera and focus on it, it's obvious that the object becomes prominent while the background gets blurred with unsharpness.
You can manually focus on an object or an area in the scene when taking a picture. Yet, iPhone will autofocus on a face or an object randomly. At that time, you can long tap an object or an area and lock it up so that the focus is fixed.
So far, a problem may occur to you what to do if the points of target focus and exposure are different but "AE/AF Lock" locks up at a certain point?
As a rule, focusing is always prior to adjusting the exposure. That being said, the focus will be fixed when "AE/AF Lock" is on, but the exposure can still be adjustable by swiping up or down. Also, you cannot adjust the focusing but the exposure via post-process. That's why focusing is of prior concern.
Despite the trend that tech stuff is becoming increasingly automatic, masterpieces are under conscious control most of the time. If you want to create your artwork, you should smartly take advantage of manual focus and manual exposure.
If you're using iPhone 7 Plus, iPhone 8 Plus, and iPhone X. You must have noticed an extra feature known as "Portrait Mode" in your iPhone camera. As the name tells, this mode is originally meant to be used when taking a photo of people, however, it is applied to more situations only if you know how to make the most out of Portrait Mode. Also, there are different modes of Portrait Lighting for your consideration: Natural light, Studio Light, Contour Light, Stage Light, and Stage Mono.
Portrait Mode even gives you tips in real time. So if you're too close, too far away, or the area is too dark, the camera lets you know. Apple is the first to integrate camera technology with artificial intelligence while camera manufacturers are still focusing on image quality. Perhaps, this new trial is far from perfect, we at least can know how two technologies come along in the future.


